

This workshop shows how to make an easy but STUNNING card using the engravers gold foil with the 3D M-Bossabilities folder. The panel has a Spellbinders labels four embossed shape within the design so it`s a perfect platform to use die shapes cut from the gold labels four or the standard labels four die.

__________________________
Click Below for a Printable A4 Worksheet
3D M-Bossabilities Foil Workshop
________________________
If you have a Facebook account
you can now follow Creative Expressions on FACEBOOK
Click here for the link
Great for latest information
_______________
Shopping List
Grand Calibur Die Cutting Machine : WIZCAL
Spellbinder Grand Raspberry Plate :WIZGC-003or Junior Raspberry Plate:WIZGC-012
Spellbinders Gold Labels Four Die : WIZS5-159
Spellbinders M-Bossabilities Floral Labels Four : WIZE3D-009
Cosmic Shimmer Clear Glue : CSPEAWHGLU
Sam Poole Art Houses A5 Stamp Plate : UMARTHOUSE
Creative Kraft Card : KRAFTCARD & Engraving Foil ~ Gold : GOLF-810
Tim Holtz Walnut Stain Distress Ink Pad : DPWALNUT
Cosmic Shimmer Clear Glue : CSPEAWHGLU
Grime Boss : GB30 & Clear & Resist Ink Pad : CRPAD
Cosmic Shimmer Gold Embossing Powder : CSDEPGOLD
Ink Blending Mat : INKBLENDMATA3
Cut `n` Dry Foam : FOAMCUT
Champagne Wrinkled Ribbon – NK02
Creative Expressions ~ Light Brown Dazzler : DAZBRWN
Ginger A4 Card :41024 , A4 Card : MILK 40109 or IVORY : 40981
Creative Expressions ~ Pearl Pins : PINWHITE
Sanding Tool
_______________________
Step by Step Instructions
1 First select the engravers art gold card, the Spellbinder 3D M-Bossabilities folder along with the pink embossing plate & a raspberry adapter plate.
1  2 Take the pink embossing plate & lay it on the work surface. Place the 3D M-Bossabilities folder with the Spellbinders name facing upwards & opened up. Add a cut panel of engravers card with the black facing upwards.
2  3 Now close the folder shut. You may which to add a piece of low tack tape to hold the card onto the embossing plate so it doesn`t move but this is optional.
3  4 Place the Spellbinders raspberry plate over the folder. PLEASE REMEMBER to use this folder combination when using the 3D folders as using the base plate will be too thick & could break your Grand Calibur machine.
4  5 Pass the prepared plates through the Grand Calibur machine to emboss the engravers card.
5  6 Lift the raspberry off the stack & open the folder to reveal the detailed embossed card.
6  7 Place the embossed panel on the ink blending mat before starting to sand the piece. Use the flat of a sanding block & gently move it back and forth over the 3D embossed areas.
7  8 Take away as much of the black as you wish to suit the effect needed for the project. Turn the sanding block up to get into the lower basket weave & sand away any unwanted black areas.
8  9 The sanding looks nice if a large proportion of the black is removed from the sides & you can go back in & distress the gold with some alcohol inks if needed.
9  10 Take either wet or a dried up Grime Boss & wipe over the embossed piece. This will pick up the loose black particles left from the sanding & clean up the panel.
10  11 Also use the same grime boss to clean the black off the blending mat.
11  12 Now select the labels four die shapes to go on the matching labels four area of the embossing folder. Here the gold labels four dies are going to be picked.
12  13 Cut the dies shapes out in different colours & sizes to have a play around with different ideas.
13  14 If you then don`t want to use a certain colour or shape, place it in a box & use for another project.
14  15 The small gold die shape has been cut & embossed in the engravers foil, so go ahead & sand the piece to reveal the gold underneath. The engravers foil is also available with silver & copper underneath.
15  16 Stack the cut die shapes onto the labels four panel on the 3D folder, until you are happy with the combination. The dies can either be stacked on top of the area or….
16  17 Underneath. Place the gold large labels four die facing cut side down onto the embossed area. Cut the piece through the Grand Calibur machine. This will flatten the embossed areas of the panel.
17  18 But this can be overcome by adding the worked piece back into the 3D folder making sure the design matches up with the embossed areas in the folder.
18  19 Pass the folder through the G/Calibur using the same raspberry & pink plates as before. This will revive the 3D effect & give you a cut out area too.
19  20 Either join 2 pieces of kraft card together make a base card or use a single panel for the piece. Measure the area to 9” x 7”or 225mm x 177mm. Add some walnut stain ink to a piece of cut`n`dry foam & distress the edges of the card.
20  21 Cut and make a mat for the panel using milk & ginger card. Just place the layers of card onto the base card & mark 2 holes either side of the bottom corner of the card to add some ribbon later.
21  22 Remove the stack of card & place the opened up base card onto a craft mat. Punch a small hole over the marked areas.
22  23 Add the prepared panels onto the base card using the Cosmic Shimmer glue. Poke the
ribbon through the holes.
23  24 Until you have both ends to the front of the card. Tie these off into a bow.
24 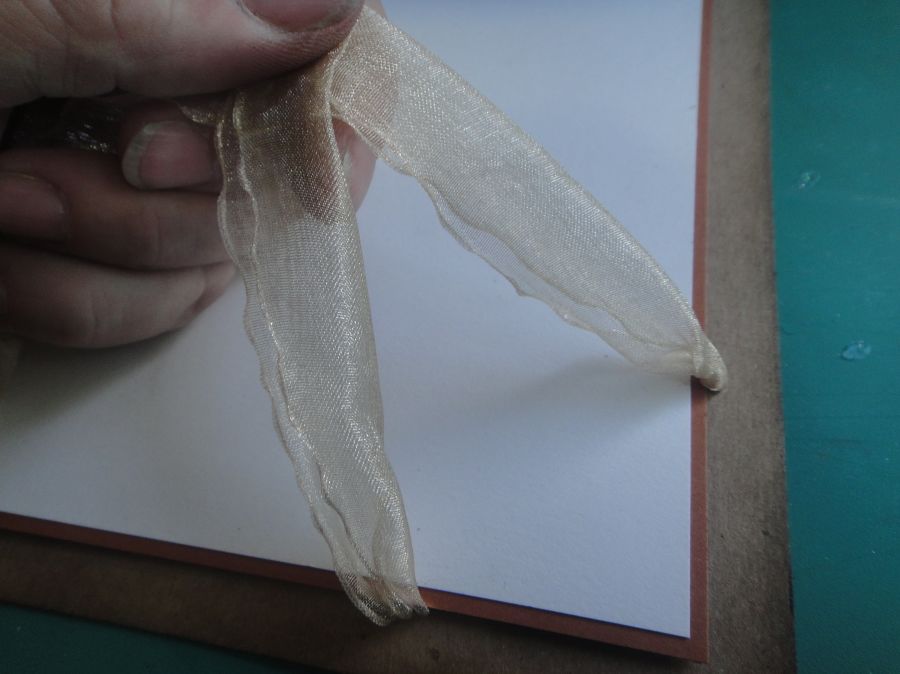 25 Add the 3D worked panel onto the card using foam tape for added dimension. Place a light brown dazzler over the knot of the bow & add 2 pearl pins into back of the bow or card.
25  26 Distress the ginger gold labels four shape & add to the aperture using glue. Then add the small black & gold shape over the top using foam tape.
26  27 Select the `sending you art` stamp from the art houses stamp plate & place it on an acrylic block. Ink up the stamp using the Ranger clear & resist ink pad.
27  28 Add gold Cosmic Shimmer embossing powder over the top before heat setting with a heat tool.
28  29 Cut around the edge of the sentiment & distress the edges with some walnut stain. Add the sentiment to the centre of the black / gold label shape to complete the project.
29  30 Try changing the ginger card for something like the teal card & use the silver based engravers foil for a different look to the piece. This card would make a lovely autumnal card or add to a glassless frame to be admired on the wall ~ Happy Crafting
30 31 The 3D M-Bossabilities range of folders are great for making a quick card & they don`t take a lot of work to make a great project.
31
__________________________
For all the Indexed Weekly Workshops
Click here


What an exciting project Suzanne! The only 3d folder I have is the beautiful shell design and I have to hold up my hands and admit that I haven’t used it yet….bad girl. This may just give me the kick start I need. I remember the engraving board from my school days and did some daffodils which my mother framed and I still have. The date by the signature is…20th April 1963! Oh heck – where did it all go?????X
Thank you Suzanne for another great tutorial. This is one I really must try, it looks amazing.